
Introduction
In this article, I guide you through setting up the Firebase Local Emulator Suite on Windows and show you how to connect it with a Flutter app using Firestore, Cloud Functions, and Cloud Storage. We’ll look at the installation process, local configuration, cross-platform emulator networking, and common Windows-specific pitfalls to avoid.
The Firebase Local Emulator Suite allows you to develop and test your app’s backend completely offline without writing to production databases, incurring charges, or worrying about rate limits. In the following sections, we’ll cover:
- Installing the Firebase CLI and emulator dependencies on Windows
- Configuring Firestore, Functions, and Storage emulators
- Connecting Flutter (Android & iOS) to local host endpoints
- Wiring up Node.js Cloud Functions to local Storage buckets
- Troubleshooting common Windows networking and permission issues
You will need a working Flutter environment and an existing Firebase project to use these code examples. If you haven’t set up Firebase in your Flutter app yet, check out my previous guide first.
Initial setup
Before running emulators locally on Windows, ensure you have Node.js (LTS version) and Java Development Kit (JDK 11 or higher) installed, as Java is required to run the local Firestore and Storage emulator binaries.
Open PowerShell or Command Prompt as an Administrator and install the Firebase CLI globally:
npm install -g firebase-tools
Next, navigate to your root project directory (where your Flutter app and Cloud Functions live) and initialize the emulators:
firebase init emulators
Select the emulators you need using the spacebar:
- Firestore Emulator
- Functions Emulator
- Storage Emulator
Accept the default ports for each service (Firestore: 8080, Functions: 5001, Storage: 9199, UI: 4000). This process generates or updates your local firebase.json configuration file:
{
  "emulators": {
    "functions": {
      "port": 5001
    },
    "firestore": {
      "port": 8080
    },
    "storage": {
      "port": 9199
    },
    "ui": {
      "enabled": true,
      "port": 4000
    },
    "singleProjectMode": true
  }
}
Start the local emulators by running:
firebase emulators:start
or
firebase emulators:start --only functions,storage,firestore
Once running, open http://localhost:4000 in your browser to access the Local Emulator Suite UI.
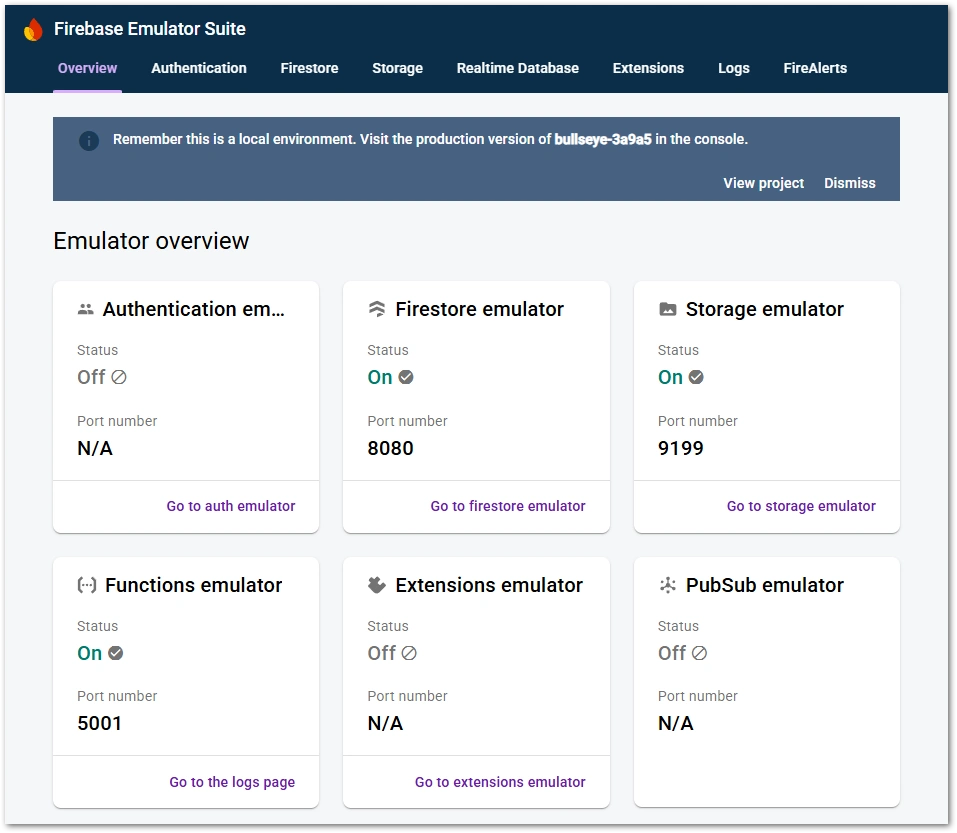
Firebase Emulator UI
Access from a Flutter application
To redirect your Flutter application’s traffic from live Firebase servers to your local machine, add the corresponding SDK emulator connection methods during app initialization.
⚠️ Critical Networking Rule:
- Android Virtual Devices (AVD): Use
10.0.2.2to target host localhost. - iOS Simulators & Web: Use
127.0.0.1orlocalhost. - Physical Devices: Use your local machine’s local network IP address (e.g.,
192.168.1.X).
Add these values to your firebase.json, so that it looks like this:
{
  ...
  "emulators": {
    "singleProjectMode": true,
    "functions": {
      "host": "0.0.0.0",
      "port": 5001
    },
    "firestore": {
      "host": "0.0.0.0",
      "port": 8080
    },
    "storage": {
      "host": "0.0.0.0",
      "port": 9199
    },
    "ui": {
      "enabled": true,
      "host": "0.0.0.0",
      "port": 4000
    }
  },
  ...
}
Add the required packages to your pubspec.yaml: cloud_firestore, cloud_functions, and firebase_storage.
Create a dedicated connection helper script in your Flutter project:
import 'dart:io';
import 'package:flutter/foundation.dart';
import 'package:cloud_firestore/cloud_firestore.dart';
import 'package:cloud_functions/cloud_functions.dart';
import 'package:firebase_storage/firebase_storage.dart';

Future<void> connectToFirebaseEmulators() async {
  // Determine the correct local host IP based on the active platform
  final String host = kIsWeb
      ? 'localhost'
      : (Platform.isAndroid ? '10.0.2.2' : '127.0.0.1');

  // 1. Connect Firestore
  FirebaseFirestore.instance.useFirestoreEmulator(host, 8080);

  // 2. Connect Cloud Functions
  FirebaseFunctions.instance.useFunctionsEmulator(host, 5001);

  // 3. Connect Cloud Storage
  await FirebaseStorage.instance.useStorageEmulator(host, 9199);
}
💡 Tip
If you use your real device for debugging instead of emulators, change the host property in firebase.json to 0.0.0.0 and use your real IP address in the above. On Windows systems, you can find it with the ipconfig command.
Call this function inside your main.dart entry point immediately after Firebase.initializeApp():
void main() async {
  WidgetsFlutterBinding.ensureInitialized();
  await Firebase.initializeApp(
    options: DefaultFirebaseOptions.currentPlatform,
  );

  if (kDebugMode) {
    await connectToFirebaseEmulators();
  }

  runApp(const MyApp());
}
Connecting Cloud Functions to local Storage
If your Node.js or TypeScript Cloud Functions process files uploaded to Storage, they must also communicate with the local Storage emulator instance rather than production Google Cloud Storage buckets.
When running firebase emulators:start, the CLI automatically exports environment variables like STORAGE_EMULATOR_HOST="127.0.0.1:9199" to your local Cloud Functions instance.
In your functions/index.js or src/index.ts:
import * as admin from 'firebase-admin';
import * as functions from 'firebase-functions';

// Firebase Admin automatically connects to local emulators
// when STORAGE_EMULATOR_HOST is set by the Firebase CLI.
admin.initializeApp();

export const processUploadedFile = functions.storage
  .object()
  .onFinalize(async (object) => {
    const bucket = admin.storage().bucket(object.bucket);
    console.log(`Processing file ${object.name} from local emulator storage.`);
    // Your processing logic here...
  });
Storage event triggers (onFinalize, onDelete) fire locally inside the emulator suite without requiring any external network access.
Common Windows pitfalls & fixes
Developing with Firebase emulators on Windows occasionally exposes specific OS-level quirks. Here are the most common pitfalls and their fixes:
Functions Log Shows Errors
You might see an error like this:
!! functions: Failed to load function definition from source: TypeError: fetch failed
The most probable cause is an error in your JS functions code. Run node --check index.js to verify. Also make sure that you don’t globally access Firebase logic outside of a function or make it lazy.
❌ Bad
const getProfileBucket = getStorage().bucket("profileData");
✅ Good (lazy)
const getProfileBucket = () => getStorage().bucket("profileData");
Android Clear Text Fix
Firebase Emulators require unencrypted connections and Android apps aren’t configured this way by default. You might get exceptions when calling emulator functions with your app. To fix this, encryption needs to be disabled in debug mode.
Go to android/app/src/debug/AndroidManifest.xml and add
<application android:usesCleartextTraffic="true">
</application>
to get around this issue.
Windows Defender Firewall Block
When running firebase emulators:start for the first time, Windows Defender may silently block incoming port connections.
Symptom: Flutter app times out with SocketException: Connection refused or network errors on 10.0.2.2.
Fix: Open Windows Defender Firewall -> Allowed Apps, ensure Node.js JavaScript Runtime and Java(TM) Platform SE binary (or OpenJDK, depending on what you use) have access checked for Private Networks.
Missing Java Executable Path
Symptom: CLI error Java needed to run emulators when executing firebase emulators:start.
Fix: Download JDK 17 or higher, install it, and verify that your JAVA_HOME environment variable is added to System Variables pointing to your JDK folder (e.g., C:\Program Files\Java\jdk-17).
Port Conflicts (EADDRINUSE)
Symptom: Error: Listen EADDRINUSE: address already in use :::8080.
Fix: Port 8080 is often taken by other local software (like IIS or alternative Web servers). Change the port in your firebase.json (e.g., set Firestore to 8088) and update useFirestoreEmulator('10.0.2.2', 8088) accordingly in your Flutter app.
Clear Cached Data Between Runs
By default, the emulator runs in-memory and clears all data when closed. If you want to keep test data persistent across sessions on Windows, start emulators with the export flag:
firebase emulators:start --import=./emulator_data --export-on-exit
Conclusion
Using the Firebase Local Emulator Suite dramatically simplifies Flutter development by allowing instant testing, cost-free iteration, and offline capabilities across Cloud Firestore, Functions, and Storage.