Introduction
This article is about how to organize your widgets in Flutter apps in small, medium, and large apps. Not all of them work in every case and some of them require more attention than others. The results also depends on what you want have.
- A clear and well-organized structure
- A simple file structure
- As few files as possible
- As few imports as possible
You cannot have everything but I can give you strategies to reach all those goals … but not at the same time.
Let’s jump right in!
The “Chaos” option
While only viable for really small projects, the Chaos option is probably the easiest one to follow. You simply put all widget files in the lib folder of your project.
lib
lib/main.dart
lib/home_screen.dart
lib/data_service.dart
lib/header_bar.dart
lib/footer_bar.dart
lib/intro.dart
lib/primary_button.dart
lib/secondary_button.dart
...
The benefit is clear: No folder structure to find the correct place for a file. Every file contains one widget. Simple and easy to understand.
This obviously only works for the smallest of projects because you will quickly end up with many files in your lib folder. The project tree in your IDE/code editor will be useless very fast and you have to rely on search features.
For beginners it’s a good choice. For team projects it’s not suited at all.
The “Feature” option
If you follow the Clean Architecture approach, you have a folder structure based on features. The approach is then to add a shared folder to all feature folder that contains widgets that are used within that feature. This is what the Feature option is all about.
For widgets that are used across features, you would add a shared folder at the root level.
lib
lib/feature1
lib/feature1/data
lib/feature1/data/...
lib/feature1/domain/
lib/feature1/domain/...
lib/feature1/presentation
lib/feature1/presentation/some_screen.dart
lib/feature1/presentation/...

# A shared folder for widgets used in feature1 only
lib/feature1/presentation/shared
lib/feature1/presentation/shared/header_bar.dart
lib/feature1/presentation/shared/...
lib/feature2
lib/feature2/data
lib/feature2/data/...
lib/feature2/domain/
lib/feature2/domain/...
lib/feature2/presentation
lib/feature2/presentation/some_other_screen.dart
lib/feature2/presentation/...

# A shared folder for widgets used in feature2 only
lib/feature2/presentation/shared
lib/feature2/presentation/shared/footer_bar.dart
lib/feature2/presentation/shared/...

# A global shared folder for widgets used across features
lib/shared
lib/shared/content_container.dart
lib/shared/...
This structure is viable for all project sizes. It’s clear for everyone to what a widget belongs.
The downside is that you and/or your team need to stick to that structure. There are no easy ways to enforce this for Dart projects. When you work on feature3 and import a widget from feature2, it should be moved to the global shared folder. However, there are no built-in tools to help you with that.
Other programming languages like C# offer reflection or packages like ArchUnitNET to create unit tests for that purpose. In Dart, this is not possible in an easy way. So it also depends on you and the team to keep this structure clean.
For small or hobby projects, the maintenance effort of this structure might be an overkill.
The “Private” option
When you want to have fewer widget files, my recommendation is to use private classes inside your widgets. You can combine widgets with the same purpose in one file and make them private (except the parent one). With that approach you can reduce the number of classes by a lot.
Let’s say you have the following widgets:
member_card.dartmember_card_header.dartmember_card_content.dartmember_card_footer.dart
They obviously belong together. So my advice would be to put MemberCardHeader, MemberCardContent, and MemberCardFooter in the member_card.dart file, make them private, and use them from inside.
But why private? 💡
Private widgets can only be used in the same file. With that you can make sure that the widget is not used anywhere by accident. If it was a public one, you could import it in any file which renders your folder structure and namespaces useless in my opinion.
But there is a drawback: It only works for widgets that are not used anywhere else. As soon as you use a widget in two or more different widgets, this approach fails.
You might maybe have unit tests with type checks (expect(find.byType(MemberCardFooter), …)). These won’t work anymore. However, you can replace them with find.byKey. But this opens up the task of managing keys in your code…
The “Barrel file” option
To tackle the number of import statements at the beginning of your Dart files, you can use barrel files. A barrel file contains many or all imports and exposes them again. This means that you only need to import the barrel file. Your import section will be much shorter with this approach.
You can do this manually or use one of many packages that help you with that like barrel_files, barreler, or barrel generator.
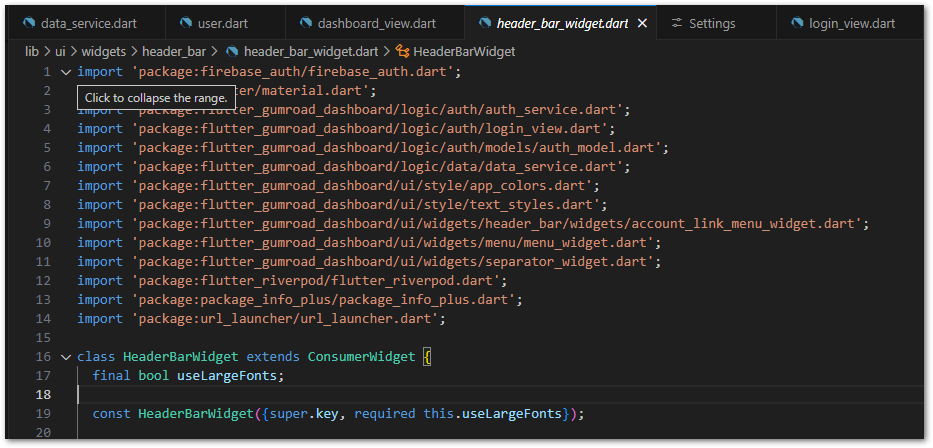
Most IDEs and code editors support code folding. This feature lets you collapse a region of a code file so that you don’t need to scroll over it. Visual Studio Code supports this for Dart files.

I consider this a good alternative for barrel files with much less effort.
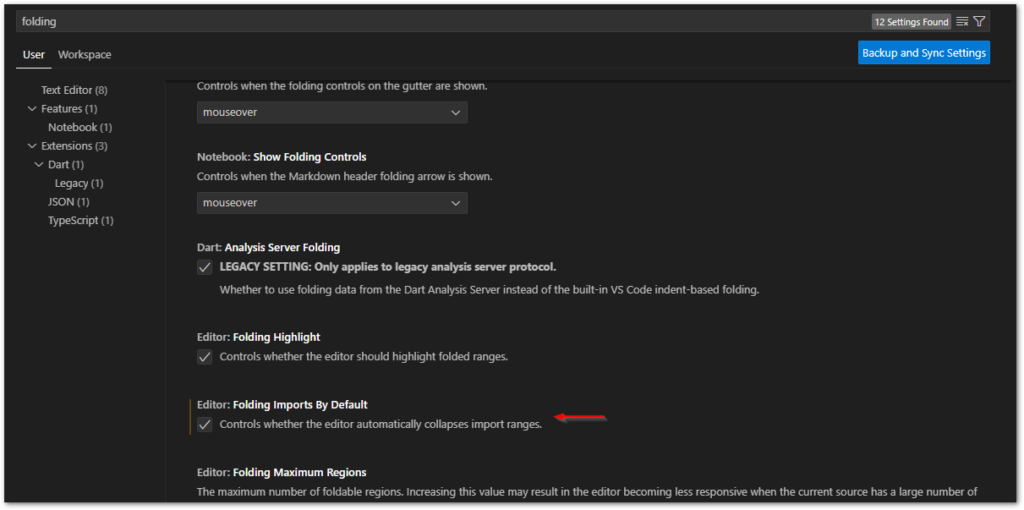
You can also configure Visual Studio Code to automatically collapse the import region by default. Go to File > Preferences > Settings > type “folding” in the search bar and active the option Folding Imports By Default.

In my opinion code folding is a much better approach than the barrel files.
The “God file” option
It’s like the Barrel option but on steroids. The benefits of the God File are that you can reduce your imports AND you can reduce the number of widget files.
A God file (I came up with the name, it’s not a real thing) contains widgets so you only have to import this one file. By moving all widget classes to one file, you also reduce the number of files in your project by a lot.
Create a file widgets.dart and place all your reusable widgets inside. In your screen or page, you simply import this widgets.dart file and have access to all classes inside.
Obviously, the file will get large quickly. To battle this, you can split it up into buttons.dart, cards.dart, or whatever elements make sense in your specific app case. This is a compromise between large widget files and number of widget files in your project.
Another benefit is that imports are a no-brainer. You can’t mess it up here.
Conclusion
In this article I gave you some tips on how to organize your widgets in a Flutter app. The outcome depends on what you want to achieve. Fewer widget files, an enforced folder structure, or just keep it simple? Pick your choices from these options and create your own rules!
Related articles


