Introduction
Let’s say you have a notification icon and want to display the number of new messages. Or you have a shop with limited items that you want to advertise. Or you have a list and want to put the index number to every item. All those use cases can be accomplished with the Badge widget. All those simple solutions can be implemented within minutes. Here is how to use the Flutter Badge widget.
Notification counter
A notification counter is a typical UI element in many apps. It shows a number next to an icon. In this example I use a message icon so that the counter could indicate the number of new messages, for example. Here is what it could look like:

And this is the code that creates the result above.
IconButton(
  icon: Badge.count(count: 25, child: Icon(Icons.message_rounded)),
  onPressed: () {
    goToMessageCenter();
  },
),
There is an IconButton with its child icon wrapped inside a Badge widget. Since we only want to display a number, the Badge.count() constructor is a reasonable choice. It display all numbers between 1 and 999 but switches to 999+ when you pass a 4-digit number.
💡 Tip
If you use negative numbers, it will display the entire input. There is no digit limit here!
A nice and easy solution for a notification counter, isn’t it?
Shop item tag
Your personal shop is going great and people are buying your products. To further encourage them to buy certain products, you want to display hints on the item cards. This could look something like this:
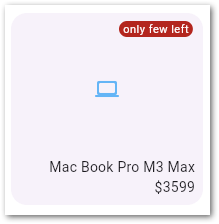
How can you to this with the Badge widget? Simple!
SizedBox(
    height: 200,
    width: 200,
    child: Card(
        child: Padding(
            padding: const EdgeInsets.all(8.0),
            child: Badge(
                offset: Offset(-60, 0),
                label: Text("only few left"),
                child: Column(
                    crossAxisAlignment: CrossAxisAlignment.end,
                    mainAxisAlignment: MainAxisAlignment.start,
                    children: [
                      Spacer(),
                      Center(child: Icon(Icons.computer_rounded)),
                      Spacer(),
                      Text("Mac Book Pro M3 Max"),
                      Text("\\$3599")
                    ])))))
The Badge widget is the parent of the content. Usually it would appear in the top right corner and extend to the right. However, you can correct the position with the Offset property to put it inside the card’s boundaries. The label property accepts any widget, but apart from Text widgets there aren’t many that really make sense here.
Your sales will go through the roof with such a simple adjustment!
List index number
For my current project I needed an item index for list elements in my UI. Maybe the Badge widget is not the first thing that comes to your mind in this case. But it works with very little effort. Here is the result:
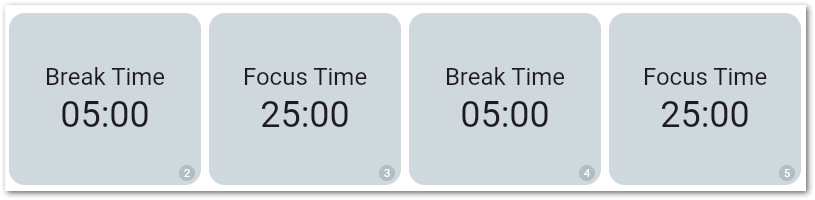
And the relevant code part is this one here:
SizedBox(
    width: 200,
    height: 140,
    child: Badge.count(
        alignment: Alignment.bottomRight,
        padding: EdgeInsets.zero,
        offset: Offset(-10, -24),
        count: widget.index + 1,
        child: Card(
            child:
              Padding(
                  padding:
                      const EdgeInsets.symmetric(horizontal: gapMedium),
                  child: Center(
                    child: Column(
                        mainAxisAlignment: MainAxisAlignment.center,
                        crossAxisAlignment: CrossAxisAlignment.center,
                        children: [
                          Tooltip(
                            message: "Break Time"
                            child: Text("Break Time",
                                style: Theme.of(context)
                                    .textTheme
                                    .headlineSmall,
                                maxLines: 1,
                                overflow: TextOverflow.ellipsis),
                          ),
                          Text("05:00",
                              style:
                                  Theme.of(context).textTheme.displaySmall)
                        ]),
                  ))
            )));
Again, I am using the count() constructor to show a number. Together with the alignment, padding, and offset property, I can place the badge in the exact location where I want it to have.
Short, simple, and functional!
Conclusion
In this article you learned how to use the Flutter Badge widget in different use cases. While you can achieve the same results with other widgets, it’s essential to know the Flutter framework and the tools it offers.
Related articles