Introduction
A ready-to-use and working build pipeline for Azure DevOps to build Flutter apps for iOS, Android, and Windows. All packages are store-ready!
Here is a working pipeline for Azure DevOps to build Flutter apps with the most recent SDK version for iOS, Android, and Windows alongside an integration and configuration guide.
It will produce an Android App bundle (.aab), an iOS IPA file, and a Windows MSIX package which can be submitted to the corresponding app stores.
The pipeline uses the cloud agents of Microsoft and can benefit from parallel builds if available (paid option). It will execute the following steps for every platform:
- Install Flutter SDK
The current stable channel version will be installed by default. - Build app (iOS, Android, Windows)
Every app is built in its own stage, so parallelism is supported. - Run tests
If there are any*test.dartfiles in the project, they will be run here. - Publish app as build artifact
Build artifacts can be downloaded or used in other pipelines
Want More Flutter Content?

Join my bi-weekly newsletter that delivers small Flutter portions right in your inbox. A title, an abstract, a link, and you decide if you want to dive in!
How can I create a pipeline from the YAML file?
Your YAML file is checked into version control, how do we get it into Azure DevOps? It’s quite easy when you know where you have to go. Here are the steps:
- In Azure DevOps go to Pipelines.
- Click the New pipeline button in the top right corner.

- Select your version control provider and the project that contains the YAML file. If you code is hosted in Azure DevOps select Azure Repos Git.

- Select Existing Azure Pipelines YAML file at the bottom

- Select the YAML file from the drop down.

The pipeline will be created after the file is validated.
What needs to be configured in the pipeline?
First, you need to install the free Flutter Pipeline Tasks of Hey24Sheep in your organization so that the pipeline can use them. The package contains several tasks like, for example, downloading the SDK or building the application. The pipeline requires these tasks to be installed.
There are also some things you need to upload to Azure DevOps to make the pipeline work.
- Android Signing Key To obtain an Android signing key follow the official documentation of Flutter. You need two files: a
.propertiesand a.jksfile. - Apple Certificate Have a look at the official documentation on how to sign iOS apps. You need an iOS key file.
- Apple Provisioning Profile A quick guide to create a provisioning profile can be found here if you don’t have it yet. You need a
.mobileprovisionfile.
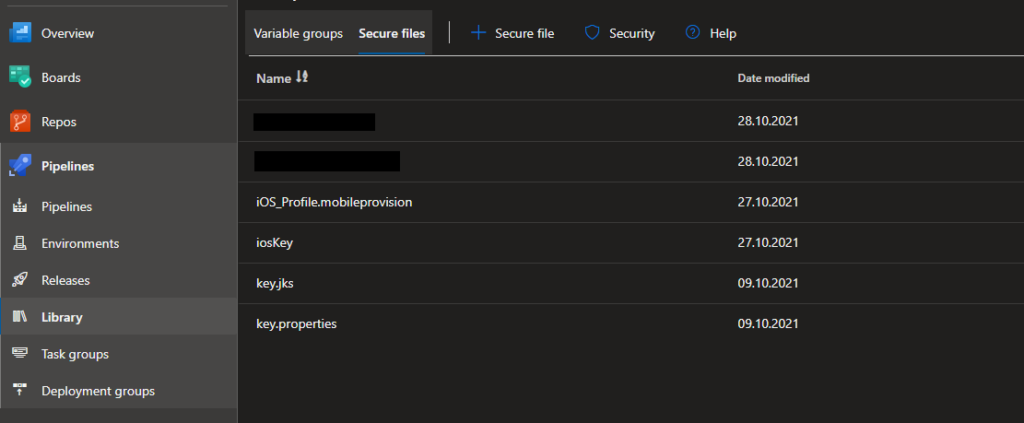
These files need to be uploaded into the Secure files part of the pipeline library. So go to your Azure DevOps instance, select Pipelines, then Library, and lastly the tab Secure files. Here you can add configuration files that should not be readable by anyone except the build pipeline. Choose descriptive names as the pipeline will reference them by name. If you match the names in the image below, the configuration will get a bit simpler as you won’t have to rename the existing file names.

Configure MSIX package information
To customize the properties of the MSIX installer package, you need to create a section called msix_config in your pubspec.yaml file. Then you can define properties like the app name, version, and supported languages. Have a look at the documentation of the MSIX package to see what’s possible.
There are multiple ways to handle package signing. Here are some guidelines and helpful resources.
- Skip installer signing
Without signing, the user will get a warning when running the package installer with your app. An installation can also be prevented depending on the system settings. Click HERE for an example of how the configuration can look in this case.
- Self-signed certificate
For private deployment and testing with the help of the MSIX installer, you need to give your application a digital signature in the form of a .pfx certificate. Click HERE for more details about how to create a certificate. And HERE is an example of how the msix_config section in your pubspec.yaml can look like.
- Windows Store handles signing
When publishing to the Windows Store, you don’t need to take care of signing your package. The store handles everything for you. Click HERE for an example of how your config can look like.
Referencing the secure files in the build pipeline
The files are uploaded, but they need to be referenced from the pipeline. If you used the same file names as in the template, then it won’t be much work.
Search for the DownloadSecureFile tasks in the AndroidStage. Change the names of key.jks and key.properties as you need them. Then head to the following Bash task which will copy the downloaded files to the correct location. Adjust the paths and file names to your needs. If the signing fails it is most likely because the files are not in the correct location(s).
In the iOSStage look for the InstallAppleCertificate task. Update certSecureFile and certPwd to your needs. Then go to the InstallAppleProvisioningProfile task and update the provProfileSecureFile property with the correct file name. At last, check the FlutterBuild task and make sure that the exportOptionsPList links to the correct file in your folder structure.
The Setup is completed, you can run the pipeline now. There should at most be a permission warning message (to handle that see below).
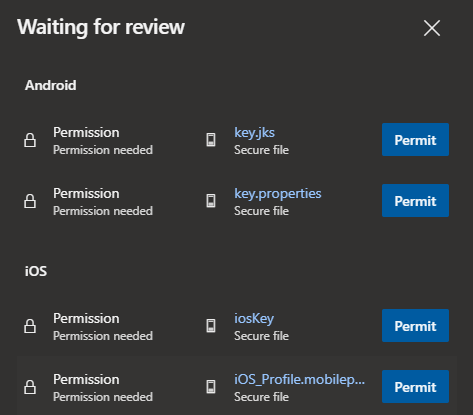
Granting permission for secure files on the first run
After your pipeline is set up and you run it for the first time you will probably notice that there is a message.


You need to authorize access to the secure files once and the pipeline will remember it until you change something.
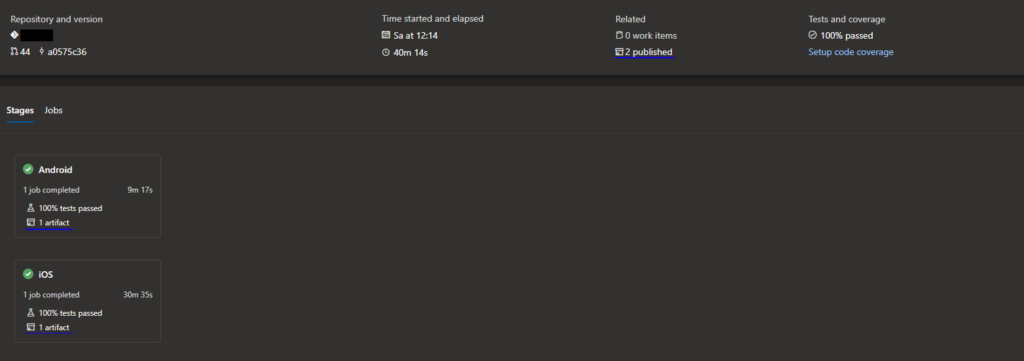
You should consider an average runtime of about 10 minutes per platform. iOS sometimes tends to be slower but overall build speed is not the fastest, I must admit.
After the process has been completed you will see a screen like below. The blue lines indicate where the created apps can be found and downloaded.

Source code
You can find the source code on GitHub.
Conclusion
In this article, you learned how to build Flutter Apps for iOS, Android, and Windows with Azure DevOps.
Related articles


