Introduction
In this article, we are going to implement navigation logic and learn how to navigate between pages in your Flutter application. Create multi-page apps without any effort!
If you don’t want to develop a single-page application, you will need a navigation pattern to get from one page to another. In a Flutter application, there are 3 different ways to handle this problem. I’ll show them to you in the following sections. Let’s see how to navigate between pages in your Flutter application!
The Navigator object
The Navigator object exposes methods to transition from one page to another within a Flutter application. It behaves like a stack data structure which means that the last element added will be the first element removed. To access the Navigator you can call Navigator.of(context) where context represents the current BuildContext. I’ll demonstrate it in the next sections.
The basic way — push and pop
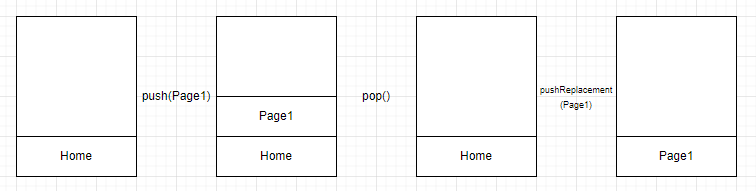
The Navigator behaves like a stack, so the most simple way is to push a new page onto it when you want to navigate to it and to pop a page if you want to go back. The following code demonstrates how to navigate to a new page.
To go back, you simply call Navigator.of(context).pop() and you’re back at the previous page. To check if back navigation is possible, there is the method canPop() which returns false if there aren’t any more pages on the stack to be popped. The hardware or software back button of your mobile device will also trigger the pop() method if possible.
❗
Warning
If you call pop() and there is only the current page on the stack, the application will be closed.
To skip the page history entirely, you can also use the pushReplacement() method. It will replace the current page with the given one so that there is only the given page on the stack. But the user won’t be able to use the back button.
The diagram shows the stack behavior once again:
The advanced way — predefined routes
Predefined routes are a good choice if you have a smaller amount of pages that don’t require any arguments to be passed in. To configure the routes, you need to fill the routes property in the MaterialApp object. A simple example is below:
In this case, you need to use the pushNamed() or pushReplacementNamed() methods of the Navigator object. So for example when navigating to the login page which has a predefined route /login, you call Navigator.of(context).pushNamed(”/login”). It is recommended to define constants for the routes to reduce possible spelling errors.
❗
Warning
Don’t forget the initialRoute property or add an onUnknownRoute handler. Otherwise, the app won’t start.
The expert way — route generation
If you don’t use the routes table, but want to go with named routes, you can add a handler to the onGenerateRoute function in the MaterialApp object. You can see an example of that below:
Every time when a route is pushed via the Navigator, this handler function is executed to find the correct page to navigate to. The name property contains the passed route. The big advantage is that you can handle navigation arguments with this approach. They are passed via the arguments property. It gives you more control than the static approach with predefined route tables.
Sending data to another page
Passing data to a page is pretty simple. When using the push-pop approach without named routes, you just need to add the data as a constructor argument.
Navigator.of(context).push(MaterialPageRoute(builder: (context) => Login(data: "dummy")));When using named routes approach, you can use the arguments parameter of the pushNamed method to pass any data you want.
Navigator.of(context).pushNamed(”/login”, “dummy”);The parameter is of the type Object, so you can pass anything you want from simple strings over maps to custom objects. The target page is responsible for parsing or casting the data. Have a look at the paragraph about route generation above. If you are using a predefined routes table, you cannot pass any data at runtime.
The pop() method can also pass data. Therefore, the caller needs to wait for the back navigation and read the passed information. Just call Navigator.of(context).pop(”dummy”); to pass a string to the caller. The caller should await the return of the data.
var res = await Navigator.of(context).pushNamed("/login"); // <-- wait for pop()
print(res as string); // prints "dummy"
Further reading
If you want to know more details about navigation in Flutter, check the following links.

Conclusion
In this article, we had a look at navigation in a Flutter application and learned how to navigate between pages in your Flutter application. Either with push and pop, with named routes, or with dynamic route generation, there are many possible ways for this task.
You can find the source code on GitHub.
Related articles