Introduction
One year ago I avoided code generation as best as I could. I always thought that it is way better to write the code yourself so that you know what happens. With generators, there is usually a different syntax with annotations and eventually some code pops out that doesn’t really look like what you have declared. But my view has changed. Now, I am always in favor of generators. And for all those struggling with it, I created this article. Learn how to create notifiers with the Riverpod generator in Flutter in the most simple way!
Setup
We need to install some packages first to use the Riverpod generator in our project.
First, we need the flutter_riverpod package. It provides the general Riverpod features. Next, we need riverpod_annotation. These annotations will be used by the generator to create files on the fly. And we need the riverpod_generator package, of course. The last package is the build_runner package for Dart to execute the code generation.
You can even install build_runner and riverpod_generator as a dev dependency. Eventually, you can run the build runner with the command dart run build_runner build when you have created your notifiers. To not run it manually after every change, you can also start the build runner in watch mode with dart run build_runner watch.
Here are 5 examples of how to create notifiers with the Riverpod generator in Flutter apps!
Example 1: Notifier
Here is a simple Notifier to start with. I use them a lot to store values like settings that I may need later. A perfect example is a filter setting. Once the user changes the filter, the result is updated based on the new setting.
import 'package:riverpod_annotation/riverpod_annotation.dart';

part 'my_notifier.g.dart';

@riverpod
class MyNotifier extends _$MyNotifier {
  @override
  SomeClass build() {
    return SomeClass(number: 0, label: "Test");
  }

  void update(SomeClass sc){
    state = sc;
  }
}

class SomeClass {
  final int number;
  final String label;

  SomeClass({required this.number, required this.label});
}
The generator needs 3 things:
- The
partimport where you specify the file for the generator. The scheme is always the current file name with.gbefore the file extension. - The
extends _$MyNotifierdefinition where the suffix is always the current class name prefixed by_$. - The
build()method that specifies the type of the notifier (SomeClassin this example). When you read or watch this notifier, you will always get aSomeClassobject.
Your notifier can (and should) also include methods to modify the state. Just make sure that you always modify the state property in your method. Otherwise, a watch won’t be triggered and a read will not get the most recent value.
Example 2: AsyncNotifier
The big benefit of AsyncNotifier is that it has different states.
- The loading state (
AsyncLoading) is used to represent ongoing work - The error state (
AsyncError) means something went wrong - The data state (
AsyncData) contains the data provided by the notifier
Here is an example:
import 'dart:async';

import 'package:riverpod_annotation/riverpod_annotation.dart';

part 'my_async_notifier.g.dart';

@riverpod
class MyAsyncNotifier extends _$MyAsyncNotifier {
  @override
  FutureOr<int> build() async {
    await Future.delayed(const Duration(seconds: 2));
    return Future.value(3);
  }

  Future<void> doSomeAsyncStuff() async {
    state = const AsyncLoading();

    await Future.delayed(const Duration(seconds: 2));

    state = const AsyncData(3);
  }
}
I’ll briefly describe the differences to the previous code example.
- Return type of
build()method is wrapped inFutureOr build()method can be asynchronous- The data type of the
AsyncNotifierisAsyncValue<int>. When you read or watch the notifier, this is what you get. To handle the different states, you can usewhen()orwhenData()if you don’t care about the other states.
That’s it!
With these small changes, you can convert any Notifier to an AsyncNotifier. Here is how you react on changes:
@override
Widget build(BuildContext context) {
  final state = ref.watch(myAsyncNotifierProvider);

  return state.when(
    error: (error, stackTrace) => const Text("error"),
    loading: () => const CircularProgressIndicator(),
    data: (data) => Text(data.toString()),
  );
}
AsyncNotifier is a powerful tool to make asynchronous UI updates really easy. With the different states you can always show the matching UI elements and not just put your users in front of a blank screen.
Example 3: Provider
I like to use Riverpod for dependency injection which makes testing easier. The ProviderScope widget has a property overrides for that. We only need to wrap all classes that we want to inject in providers. Here is how you do it.
This is the class to wrap. It’s a simple example of a database service that simulates reading and writing data.
class DatabaseService {
  Future<String> read() async {
    await Future.delayed(const Duration(seconds: 1));
    return Future.value("Test");
  }

  Future<void> write(String data) async {
    await Future.delayed(const Duration(seconds: 1));
  }
}
The provider for the generator looks like this:
import 'package:riverpod_annotation/riverpod_annotation.dart';
import 'package:test/database_service.dart';

part 'database_service_provider.g.dart';

@riverpod
DatabaseService databaseService(Ref ref) => DatabaseService();
It’s a bit different to the notifiers from before. We start with the class name followed by the name of the generated provider (the suffix Provider will automatically be added, so the resulting provider is called databaseServiceProvider). Then it requires an argument of type Ref. You can pass this reference to your class or use it to read values from other providers that your class may require. The last step is the initialization of your DatabaseService class.
To use this provider, try await ref.read(databaseServiceProvider).read(). It does not make sense to watch this provider since the value will never change.
And when you want to override this class for a test with a mocked class, then you can do this like that:
void main() {
  runApp(ProviderScope(
    overrides: [databaseServiceProvider.overrideWithValue(DatabaseServiceMock())],
    child: const MyApp(),
  ));
}
The provider will then return the mock instead of the real class. This also works for notifiers.
Example 4: No automatic disposal
By default, the code generator always create types with AutoDisposeXXX. This means that the Riverpod framework can decide to throw them away and free resources if they are not part of the widget tree anymore. Sometimes, this behavior isn’t desired however. To fix that, change your declaration and set the keepAlive property to true. Here is a code example for you:
// AutoDispose on
@riverpod
class MyNotifier extends _$MyNotifier { ... }

// Method 1: AutoDispose off
@Riverpod(keepAlive: true) // <-- watch out for the capital letter!
class MyNotifier extends _$MyNotifier { ... }

// Method 2: AutoDispose off
@riverpod
class MyNotifier extends _$MyNotifier {
  @override
  int build() {
	  ref.keepAlive();
	  return 3;
  }
}
For example, you can use this to cache app settings like the theme, the font size, or anything else that makes sense in your case.
Example 5: Notifier with AsyncValue vs AsyncNotifier
I have found out to be misusing Notifiers in an async way. You can do this by setting the return type of the Notifier to AsyncValue<T>.
Let’s compare a Notifier of type AsyncValue<int> and AsyncNotifier of type int. Here is the code for both of them:
// AsyncNotifier
import 'dart:async';

import 'package:riverpod_annotation/riverpod_annotation.dart';

part 'my_async_notifier.g.dart';

@riverpod
class MyAsyncNotifier extends _$MyAsyncNotifier {
  @override
  FutureOr<int> build() {
    return Future.value(3);
  }
}

// Notifier with AsyncValue
import 'package:riverpod_annotation/riverpod_annotation.dart';

part 'my_other_async_notifier.g.dart';

@riverpod
class MyOtherAsyncNotifier extends _$MyOtherAsyncNotifier {
  @override
  AsyncValue<int> build() {
    return const AsyncData(3);
  }
}
The original code differs in a few areas. The return types are not the same (FutureOr<int> and AsyncValue<int>) and also the code inside the build() method. Another thing that is worth mentioning but not in the code example here: the build() method of the Notifier cannot be async. If you need async initialization, go with an AsyncNotifier.
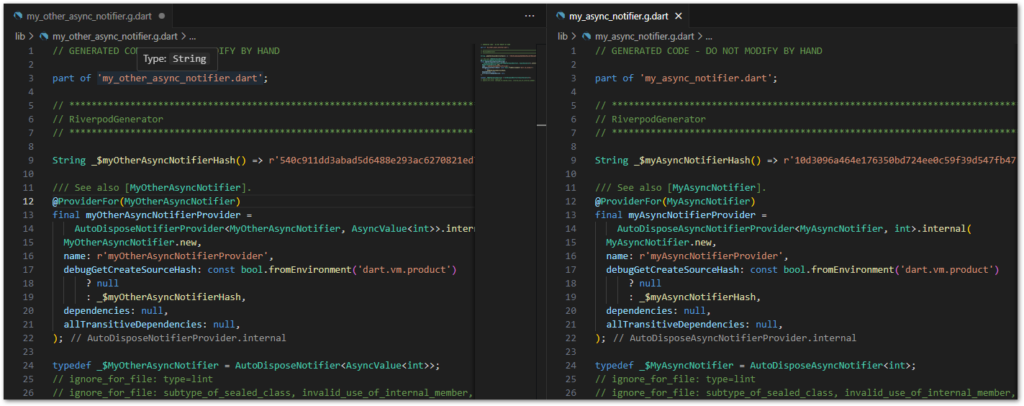
The generated code again looks pretty much identical for both files with very little differences except for the types
AutoDisposeNotifierProvider<MyOtherAsyncNotifier, AsyncValue<int>>AutoDisposeAsyncNotifierProvider<MyAsyncNotifier, int>
But when you use them in your code, you might not even notice a difference at first. You can watch both with ref.watch() and they both offer the when() method to react to different states.
But there is one detail that shows that the AsyncNotifier is better in general. Here is the code to illustrate the fact:
@override
Widget build(BuildContext context) {
  final state1 = ref.watch(myAsyncNotifierProvider);
  final state2 = ref.watch(myOtherAsyncNotifierProvider);

  print("AsyncNotifier: ${state1.runtimeType.toString()}");
  print("Notifier with AsyncValue: ${state2.runtimeType.toString()}");

  ...
}
We watch both notifiers and print the types for comparison. Here is the output:
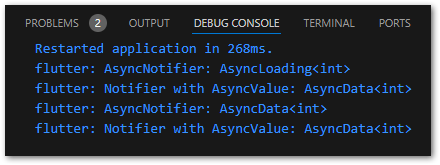
AsyncNotifier starts in the loading state and transitions to the data state when the build() method is completed. The Notifier with AsyncValue however is never in the loading state during initialization. This means when you watch those notifiers and want to display a loading indicator in the loading state during initialization, it won’t work with the Notifier because it never is in the loading state.
Apart from that, you will probably also have some cases where you replace when() with whenData() because you don’t really care about the other states. When I realized that I was at that point, it made sense to question the choice of using AsyncValue<T> as a return type. Eventually I just started using T.
Conclusion
In this article, you learned how to create notifiers with the Riverpod generator package in Flutter apps so that you don’t need to write that much boilerplate code. With the provided examples you should be able to write your own notifiers with the help of code generation. It is difficult in the beginning but once you get the idea (and some details), you don’t want to go back anymore!
Related articles