
Introduction
There are some differences to WPF that you should be aware of. Here is how to create custom controls with data binding in .NET MAUI.
.NET Maui includes several controls out of the box, which you can find listed here. If you need additional controls, you can check out this collection. And if the control you need is not available, you will have to create it yourself. That is what we will be doing now!
We will be implementing a custom button control based on the .NET MAUI Button, with a bindable caption.
Create a custom control
First, add a new .NET MAUI Content View (XAML) to your project. It will look like this:
Next, change it to a Grid with a Button inside.
Don’t forget to change the type from ContentView to Grid in code behind!
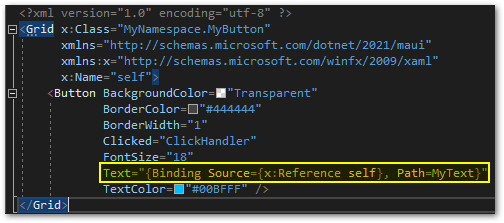
Now, we will add make the Text property of the Button bindable. Add the line Text=”{Binding Source={x:Reference self}, Path=MyText}”. This tells the control to look in its code behind for the property and not in the BindingContext (which is the parent BindingContext by default if you don’t specify one).
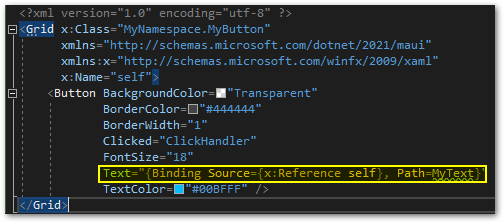
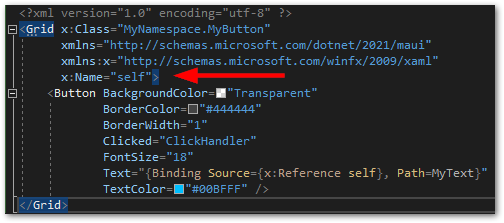
Visual Studio will inform you that it cannot find a property with this name yet. We also have to add a x:Name declaration to the XAML.
And then we add a BindableProperty in the code behind file to complete the binding.
When you look at the binding in XAML again, Visual Studio should no longer report any errors.
Your control is ready to use!
🔔 Hint
You don’t need a view model and you don’t need to set any BindingContext!
Use the custom control
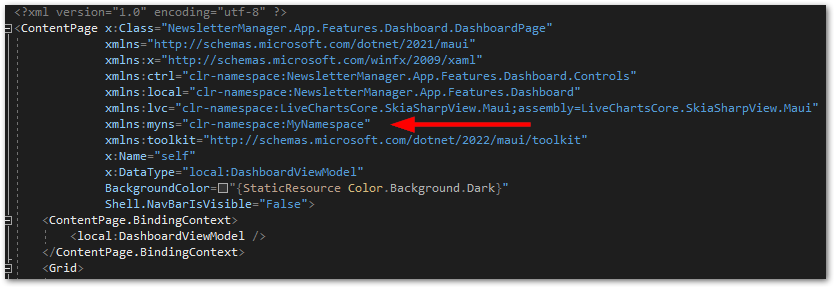
To use the new control, go to any XAML page and import the namespace of the control.
After that, you can finally reference the new control and pass data to the Text property. Use the following code:
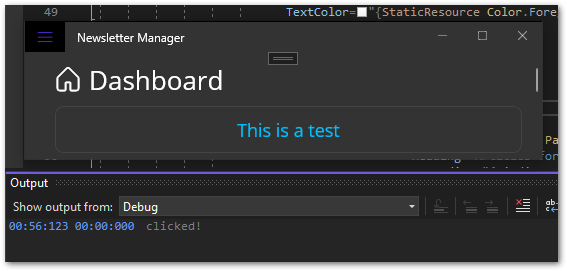
<myns:MyButton MyText="This is a test" />You can also add other properties that you want to be bindable. Now that you know how to do it, it shouldn’t be a problem.
Want More Flutter Content?

Join my bi-weekly newsletter that delivers small Flutter portions right in your inbox. A title, an abstract, a link, and you decide if you want to dive in!
Final test
Run the app on whichever platform you prefer and verify the results. Ensure that the button caption matches the definition in your XAML, and check the output window in Visual Studio to confirm when a user clicks the button.
Typical errors
Here are some typical errors that users make in the beginning and how you can fix them.
Wrong initialization order
Here is the same button but with a Command binding instead of the Clicked event handler.
The issue is that the command is not firing and there is no text in the output window of Visual Studio. This is because InitializeComponent() binds the value of MyCommand to the button’s Command property. However, MyCommand is not initialized at this point and is null. Therefore, nothing happens when you click the button.
There are several possibilities to fix this. You can insert OnPropertyChanged(nameof(MyCommand)); after initializing MyCommand. Alternatively, you can move the InitializeComponent() method after the MyCommand initialization. Another option is to initialize MyCommand at the property declaration using
public ICommand MyCommand { get; } = new RelayCommand(() ⇒ Debug.WriteLine(”clicked!”));Just be aware of the order of initialization!
I can’t access properties of my new control!
To be able to set values in XAML from outside, you need to declare a public BindableProperty. Normal properties are not enough and IntelliSense will not show them in your XAML code while typing.
You need a property only inside your control ⇒ normal property
You need a property to be accessed from outside ⇒ bindable property
Conclusion
In this article you learned how easy it is to create custom controls with data binding in .NET MAUI. You also saw some typical errors that can happen and lead to frustration.
Related articles