
Medium writers, Youtubers, and TikTokers do it already. Here is how you can organize your blogs, videos, and digital products with Notion. A free template is included.
Every content creator needs to manage their publications. No matter if you create blogs, videos, or digital products, you need to have a management system at some point. Notion can help you with that. In this guide, I’ll show you how to use Notion to Create a Content Management System for Content Creators.
I can promise you this: At one point, you’ll be lost without proper organization.
- Maybe you want to republish on another platform but you don’t have the raw files anymore.
- What tags did you use for what type of content and how did it perform?
- Collect information about the content type, platform, direct links, or other useful metadata
Good organization is indispensable! That’s why we start today by building our own customizable management system. It’s better to start late than never!
You have never heard of Notion or what it can do for you? Here is a short introduction:
What is Notion?
Notion can be your goal tracker, tax manager, blog archive, note app, and much more! Try it for free now!
We’ll cover how to
- Set up and fill a database
- Create custom views to only see specific data
- Add templates for different item types to be faster
- Enhance the visual output with icons, descriptions, and colors
Brainstorming phase
First, you need to clarify what information you want to store and why. It doesn’t make sense to put “everything” in a database, just because it is possible.
- If you just publish YouTube videos, then a data column to indicate that the platform is YouTube doesn’t seem reasonable
- But if you want to analyze the relationship between video length and user engagement, then these properties need to be part of your database
It doesn’t need to be perfect in the beginning. And it most probably won’t be! Your system will evolve over the next months and years. To kickstart your progress, I’ll give you some ideas in the next chapter.
Create a database
Ok, let’s start right away. Create a new page and insert a database. Next, add columns for properties you want or need to store. Don’t worry, it won’t be perfect in the beginning. Your system will evolve over time, but the main point is to get started.
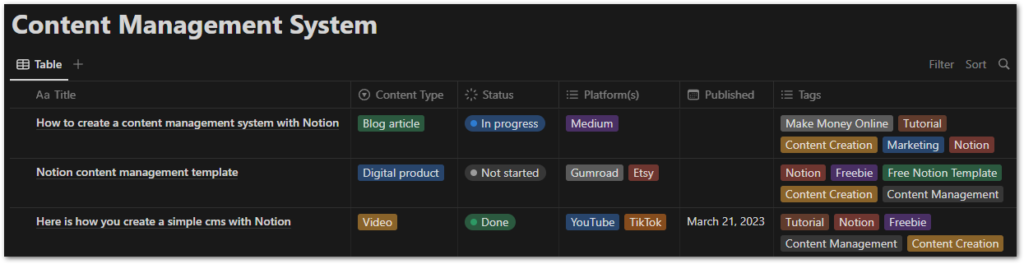
Here are some ideas for columns that might be useful:
- Title
Contains the name of the content that will be published - Content Type
A column of type Select to identify the type of content. This is only useful if you create more than one type of content. - Status
A column of type Status to show the work progress of this item. - Platform(s)
A column of type Multi-select to note all platforms this item is published to. Once again, this is only useful if you are present on multiple platforms. - Published
A column of type Date to show the publication date of an item - Tags
A column of type Multi-select to contain all tags that are associated with this item
Remember that you can include anything you want to track. Direct links, likes, earnings, length, comment count, … whatever you like. But keep in mind that more information requires more work!
Here are short examples of how to create Select and Multi-select columns with options:

Get Free Daily Flutter Content!

Small daily Flutter portions delivered right in your inbox. A title, an abstract, a link, and you decide if you want to dive in!
Add different views for different purposes
With views, you can focus on data that is relevant for a specific purpose. Maybe you just want to see everything that has not be started yet. Or you want to create a monthly overview. Or you are only interested in items that gained more than $100 so far. All that is possible with views.
A view uses the data of the database and presents it in a different way. They are especially useful when your number of columns grows. All views also update automatically if you change values in anyone of them.
When you create a new database, a default view is created. It’s always a table layout without grouping, sorting, or filtering and the name Table.
I will show you how to create some additional views:
- A monthly overview
- A status board
- A view for every content type
? Monthly overview
This view is useful to see what and how much you published over the months.
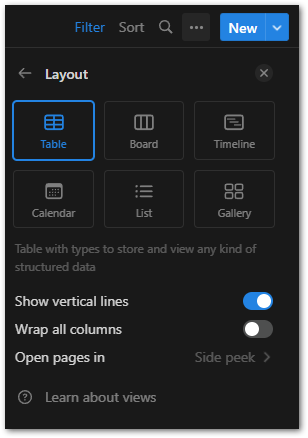
Click on the + button in the header line of the database to create a new view and set the following options:
- Set the Layout to Table and give the view a descriptive name. Click Done when you are finished.
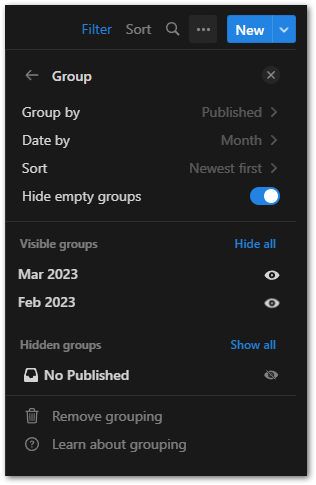
- Open the Group option, set the Group by property to your Published column, the Date by property to Month, and the Sort property to Newest first. Optionally, you can hide empty groups and the group with items without a Published date set. They won’t appear in this view.
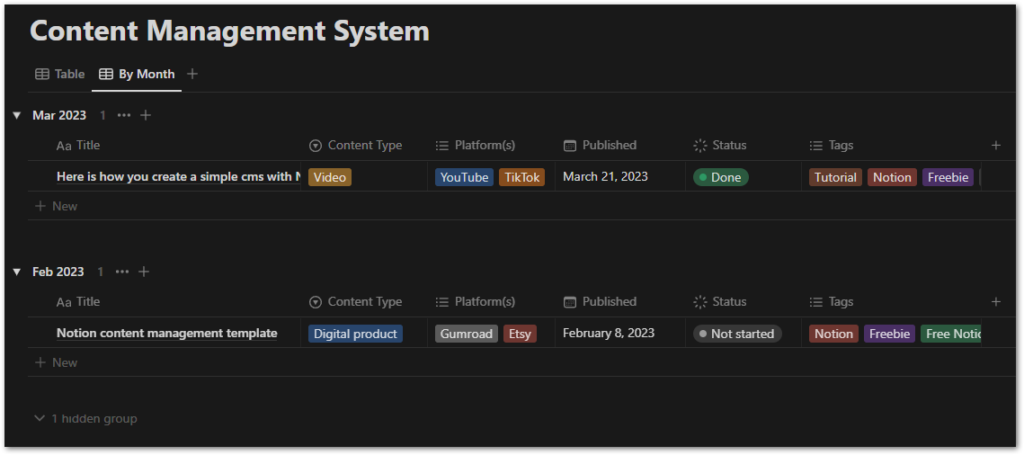
- And here is a final result:
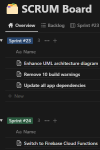
? Status board
A status board helps you identify the state of your content.
Click on the + button in the header line of the database to create a new view and set the following options:
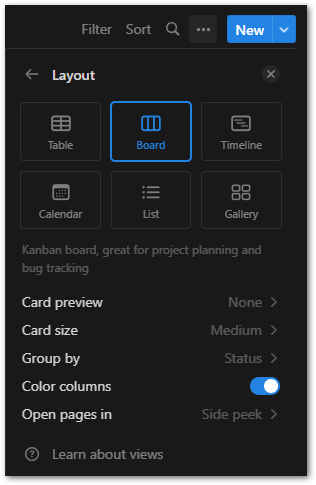
- Set the Layout option to Board and the Group by property to Status. Click Done when you are finished.
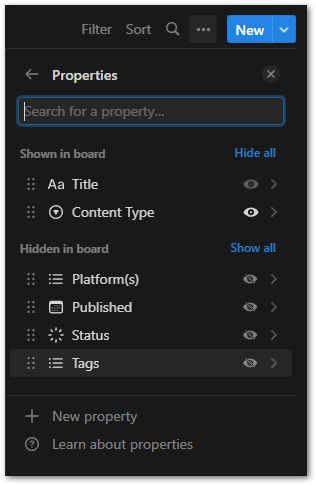
- You can also play around with the properties that are visible in the board. In this example, I switched the Content Type property to be visible.
- And this is what it will look like in the end
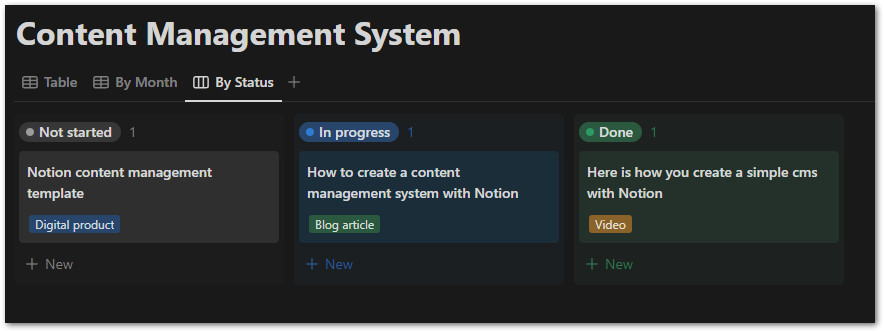
You can even drag & drop items from one column to another and their status value will update accordingly!
?
Tip
If you need more than 3 groups for your states, don’t use the Status property. Go for a Select property and add groups as you need them. Use this new column in the Group by property when configuring the Board layout.
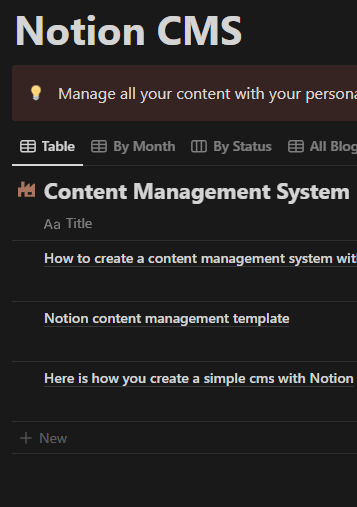
? Views per content type
If you publish more than one content type, it can be useful to create a view for each type.
Click on the + button in the header line of the database to create a new view and set the following options:
- Set the Layout to Table and give the view a descriptive name. Click Done when you are finished.
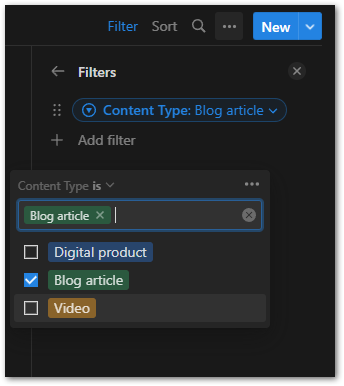
- Add a Filter option of the property Content Type. Select one of your content types from the list.
- This is what the view will look like
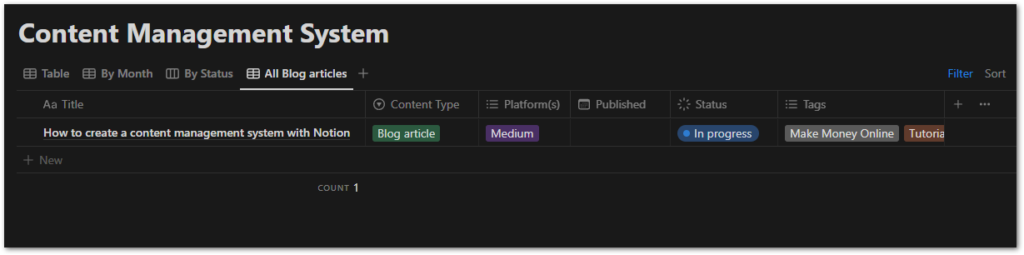
Repeat the process for each content type and you’ll have a good overview. You can also experiment with other layouts like the Gallery layout. And it also makes sense to hide columns if they are not needed. In a view called All blog articles it’s obvious that the content type is always Blog article.
Play around, customize your system, and make it the way you need it to be!
Add templates to create items more quickly
Templates are a good and powerful way to create items more quickly. Let’s say you want to write a blog article. Depending on your style, you might have several parts that are always identical.
- The article outline with heading, subheading, introduction, content, and conclusion
- A call-to-action section at the end of your article
- Placeholders for references to related articles
With templates, you can define these sections once and they will be added to every new item that you create in your database.
It’s also possible to set property values. A template for a new video could automatically set the content type to Video, the platform to TikTok, and the status to Not started.
I will show you can define templates to create items more quickly.
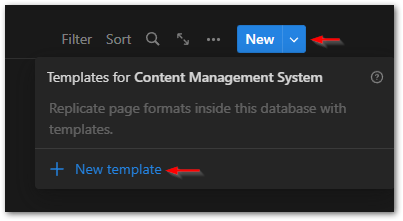
To create a new template, click on the dropdown arrow of the New button on the right. Then, select New template.
An editor pops up with a notification bar at the top to indicate that a template has been created or edited. You can fill out the properties and prepare the page for faster item creation. Below are three examples of templates to demonstrate the concepts behind the template system. Of course, you’ll need to create your own templates depending on the content you are producing.
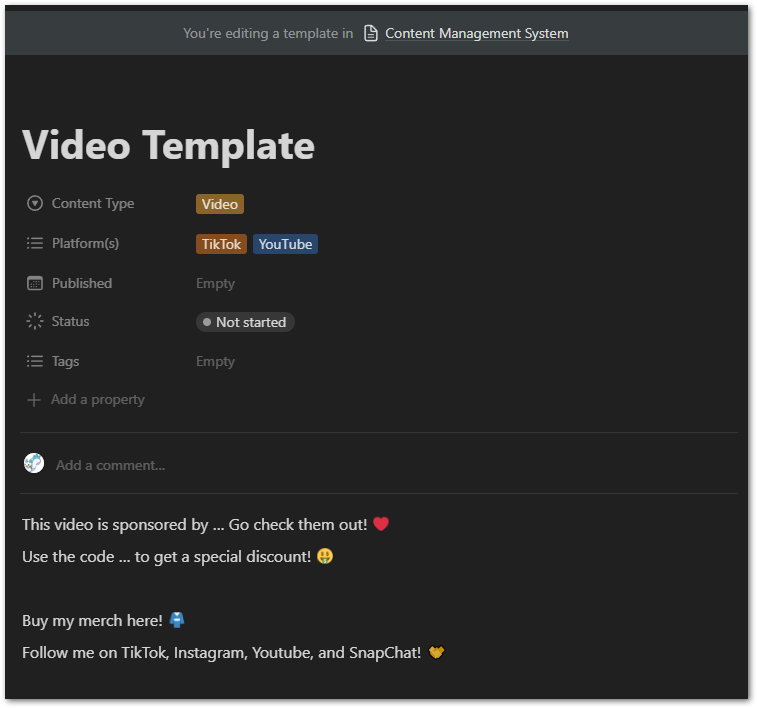
This template sets all video-related properties like Content-Type and Platform(s). In addition, it defines a part of the video description with social media profiles and sponsors. You can use this to quickly insert your video description on the platform(s).
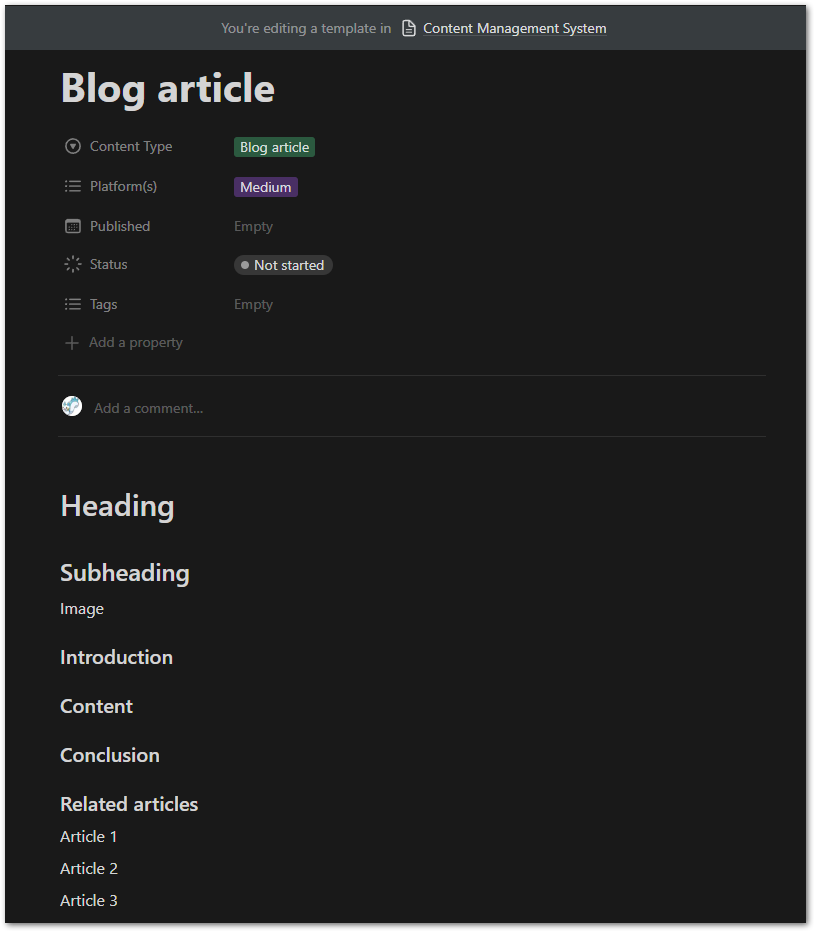
The Blog article template is, as the name implies, intended to speed up the creation of blog posts. The page content describes the outline of a post so that you can use this as a guideline for your writing.

Here is an example template for digital products. The relevant properties are set to their respective values. The page content includes a checklist to ensure that you don’t miss anything important before publishing a product.
The purpose of templates is to expedite repetitive tasks. Identify tasks that you frequently perform and attempt to address them with a template. This can save a significant amount of time over the course of several months.
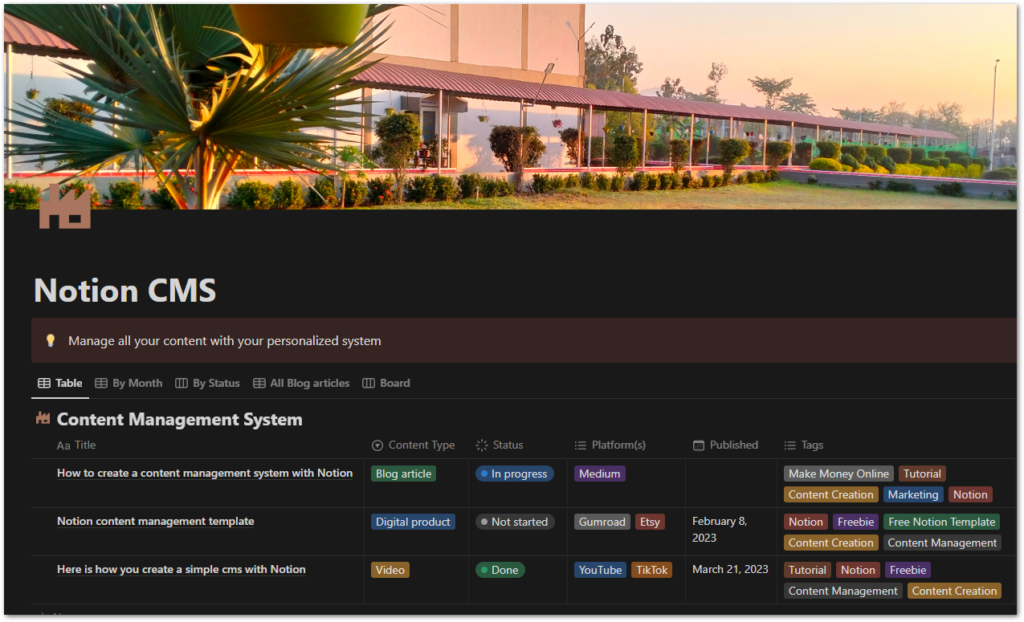
Improve the look and feel of your cms
The final touch comes from adding icons, covers, and descriptions. It makes the page look really nice and shiny. You can be as creative as you want or you just keep it simple. Here is my proposal:
Conclusion
Creating a Content Management System in Notion requires time and effort. This article provides some ideas for how to do so. While there are many templates available, I prefer to build my own system. However, if you prefer to use a template, you can access a free one here.
?
Hint
All Notion links are affiliate links. If you order a paid package, I receive a commission without any extra costs for you!
More about Notion
Personal Goal Tracker
Use this template to define and track your goals. Adapt it to make it your own. It’s simple, stylish, and useful!
Notion SCRUM Board
A full-fledged SCRUM board in Notion? Use this template and manage your SCRUM project successfully!
Notion AI

Learn about the capabilities of Notion AI and why it can be a useful investment for writers using Notion.
Notion CMS
Build your own content management system with this free template and get better organized.
Charts in Notion
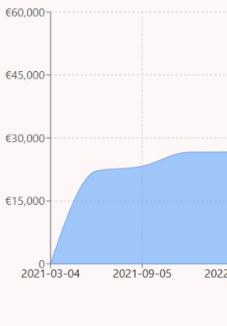
Learn how you can add charts in Notion to visualize data in a different way. Follow my detailed guide.