Introduction
Save coding time by using Firebase Extensions and create an URL shortening service in minutes! Here’s the full guide.
With a few simple steps, you can build your own personal URL shortening service. All you need is a Firebase account and a Bitly account. The setup involves no coding. To test the service, we will write a small Flutter app.
Firebase offers a variety of extensions. The major benefit is that you gain functionality without having to code anything yourself. I already wrote a detailed article about it if you need more details.
?
Hint
Be aware that you might run into some costs. An installed extension costs around 1 cent per month and it normally uses other services in the background which can increase these costs. You will also need to activate the Blaze plan.
Bitly Setup
First, create a free Bitly account. Next, generate an access token that we can use to access the service from Firebase.
Log into your account. Then go to Settings → API. Enter your password and hit the button to generate an access token. Copy the token as it will disappear when you reload the page. See the image below for details.
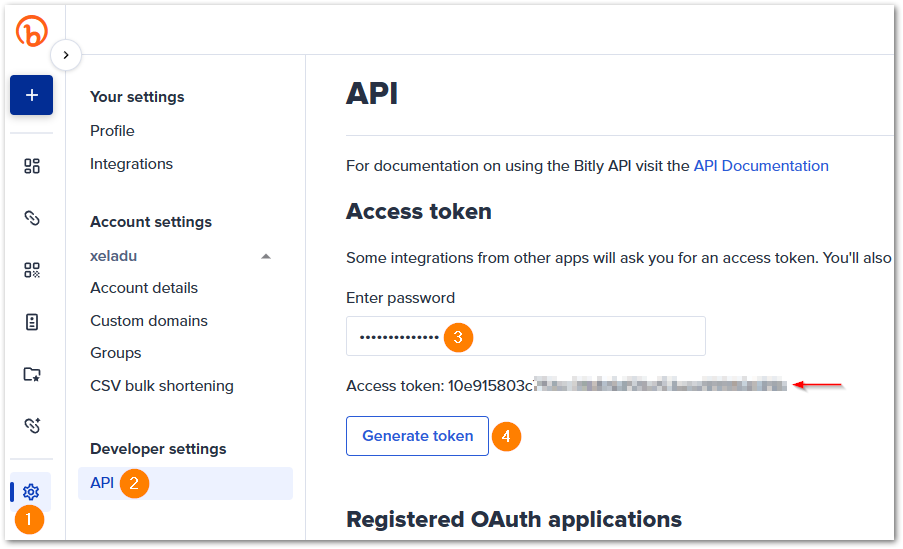
We have our access token which is required by Firebase. Bitly allows the creation of 10 short URLs per month with the free plan.
Want More Flutter Content?

Join my bi-weekly newsletter that delivers small Flutter portions right in your inbox. A title, an abstract, a link, and you decide if you want to dive in!
Firebase Setup
First, we need to install the required extension. Go to Build → Extensions.
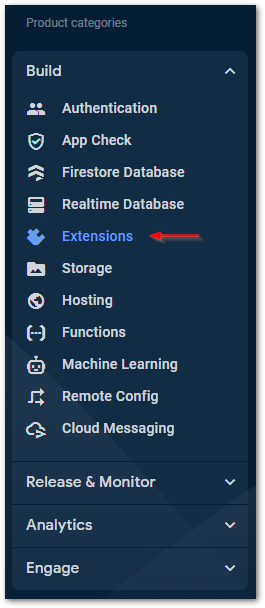
Next, hop to the marketplace, find the extension Shorten URLs, and install it.

You might need to enable some Google Cloud features to make the extension work.

During the last step, you can configure the extension. Don’t worry, you can change the values later (except for the Cloud Functions location).

So, what values are required here exactly?
- Cloud Functions location indicates where the server is located that handles calling Bitly to shorten a url and writing the result back to Cloud Firestore. Check out my article about Cloud Functions and especially the section Regions for more details.

- Bitly access token expects the access token that you created earlier
- Collection path indicates the path inside the Cloud Firestore NoSql database
- URL field name is the name of the field where the long form url is stored
- Short URL field name is the name of the field where the short form url is stored
You can use the default values, but you need to provide the Bitly access token!
Hit install and wait a few minutes until the process is completed!
?
Hint
What happens behind the scenes? When the field value changes, a cloud function is triggered (you can see it in the Cloud Functions Dashboard of Firebase). It calls the Bit.ly service to shorten the given url and writes the result back to the Cloud Firestore document.
Verify Firebase Setup
You can see that a function was deployed in your Cloud Functions dashboard.

Head over to Cloud Firestore, create a new collection (click on Start collection), and a document containing the two fields according to your configuration. The document ID can be auto-generated.
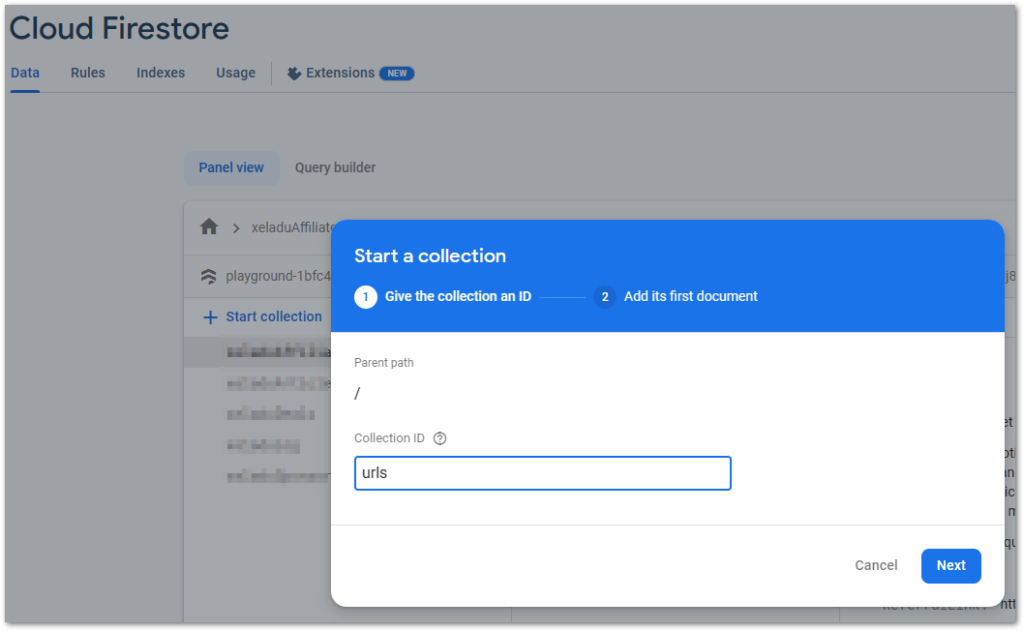
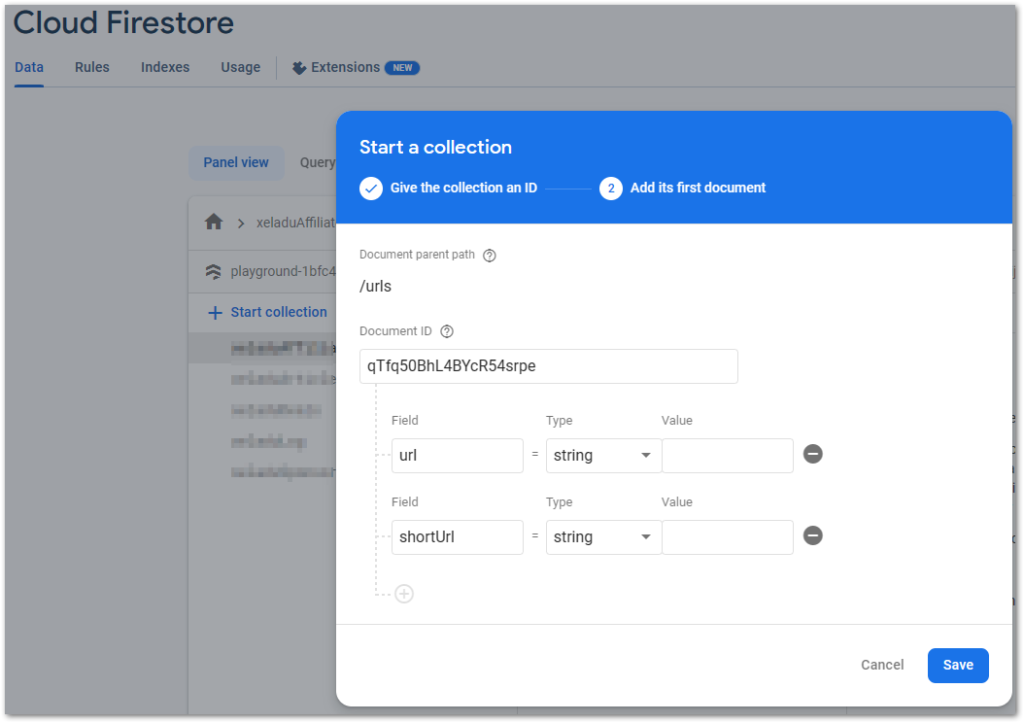
The Firebase setup is completed. Let’s write a simple Flutter app to make use of our workflow.
App Setup
We need to create an app that writes text to Cloud Firestore and listens to changes which it will then display to the user.
Step 1: Create a Flutter project.
Use the command flutter create my_sample_project or your IDE of choice for it.
Step 2: Link it with your Firebase project.
Run flutterfire configure from the project root folder and follow the wizard.
Step 3: Install Firebase packages.
We need the Core package and since we want to use Cloud Firestore, we need that package, too.
Step 4: Add Firebase initialization code.
Add await Firebase.initializeApp(options: DefaultFirebaseOptions.currentPlatform); to main function and make it asynchronous.
If you struggle with the process, read my detailed article below.

Step 5: Build a simple UI.
I’ll go with one TextField widget, one ElevatedButton widget, and one Text widget inside of a StreamBuilder for the result.
Step 6: Connect UI to Cloud Firestore.
The button sends the text to Firestore and the UI listens for changes. Here’s some code:
And this is what the final example can look like:
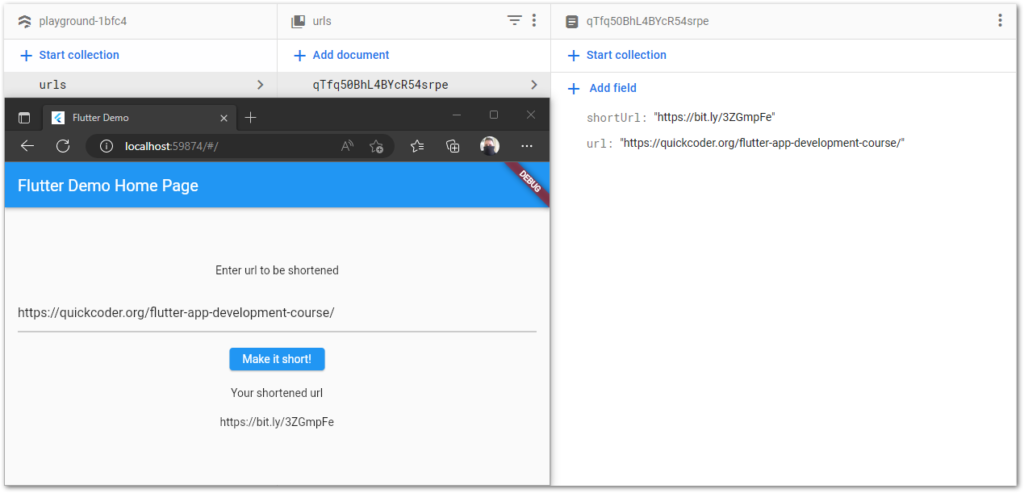

An URL shortening service with a companion app in under one hour. It’s just amazing what you can build today!
How much is it?
As mentioned earlier, this workflow is not for free. You will be charged for the following reasons:
▶ Firebase resources of the extension (around 1 cent per month)
▶ Cloud Firestore
▶ Cloud Functions
▶ Additional Firebase and Google Cloud Platform services
Some of these services have free quotas (Cloud Firestore for example) but not all of them. The final price is always connected to the number of users your app will have. Monitoring your expenses is highly recommended.
If you are just experimenting with Firebase, you won’t get charged more than some cents per month.
Flutter ❤️ Firebase

Get started with Firebase and learn how to use it in your Flutter apps. My detailed ebook delivers you everything you need to know! Flutter and Firebase are a perfect match!
Conclusion
This is a small example of what you can build with Firebase and its features. The source code of the Flutter app is available on GitHub.
Related articles


