

Introduction
Let’s learn how to add a Google map to your Flutter app and use location services to display the current position. Everything you need to know to get started with Google Maps in Flutter is right here!
If your app relies on location data and a map, you can integrate a Google map quite easily. I’ll guide you through the setup process and show you how you can customize the map the way you want it to be. Here is how to add a Google map to your Flutter app.
Installing the package
Run the command flutter pub add google_maps_flutter to install the package. If you are unfamiliar with installing packages, check out the article below for details.

Getting the API key
To use the widget, you need to request an API key.
- Go to https://console.cloud.google.com/ and choose your project. If you don’t have an account or project set up, follow the instructions to do so
- Use the search bar and go to Google Maps Platform
- Head over to the APIs submenu
- Select Maps SDK for Android and activate it
- Select Maps SDK for iOS and activate it
- After enabling the SDKs go to Credentials and create new credentials with the button in the top bar

Your API key is ready to be used in our Flutter app!
❗
Warning
In a production app, you should read about access limitations for your API key. For this demo, it won’t be necessary. Details can be found here.
Configuring the app
Depending on the platform you want to support, additional configuration steps are required.
✅ (Android) Your minimum Android SDK version must be set to 20 or higher
In your Flutter project directory go to android/app/build.gradle and search for minSdkVersion inside the defaultConfig section. Replace the value (or Flutter variable) with 20.
✅ (Android) Your API key must be added to the application manifest
In your Flutter project directory go to android/app/src/main/AndroidManifest.xml and find the <application... node. Add the following code inside the node and replace the value with your created API key.
 <meta-data android:name="com.google.android.geo.API_KEY"
            android:value="YOUR_API_KEY"/>
✅ (iOS) Your minimum iOS version must be 9.0 or higher
This should already be the case because Flutter itself requires that version. Otherwise, check this article at the step iOS Deployment Target.
✅ (iOS) Your API key must be added to the application delegate
In your Flutter project directory go to ios/Runner/AppDelegate.swift and adjust the code as seen below
import UIKit
import Flutter
import GoogleMaps

@UIApplicationMain@objcclassAppDelegate:FlutterAppDelegate {
overridefuncapplication(
_ application:UIApplication,
    didFinishLaunchingWithOptions launchOptions: [UIApplication.LaunchOptionsKey:Any]?
  ) -> Bool {
    GMSServices.provideAPIKey("YOUR_API_KEY")
    GeneratedPluginRegistrant.register(with:self)
    return super.application(application, didFinishLaunchingWithOptions: launchOptions)
  }
}
You have configured your app properly. Let’s move on to integrate a Google Maps widget.
❗
Warning
Newer versions of the package might require different settings. Make sure to check the setup guidelines and adjust your code accordingly.
Adding the widget
To add a map, you can use the following code. It will display a map with the center over Berlin in Europe. For a more complex version, please refer to the GitHub repository with code samples.
There are a lot of properties to configure the map like rotateGesturesEnabled, zoomGesturesEnabled, trafficEnabled, or liteModeEnabled (only for Android). Customize it completely your way!
Handling events
The widget offers various events that you can handle
onTaponLongPressonCameraMoveonMapCreated
The onMapCreated event returns a GoogleMapController which gives you complete control over the map. Some exposed methods are
getLatLng– returns the latitude/longitude combination of a screen positiontakeSnapshot– returns a byte array of the current map imagemoveCamera– jumps to a given position (see section “Moving the camera”)animateCamera– moves to a given position (see section “Moving the camera”showMarkerInfoWindow– shows the info window of a given marker (see section “Adding markers”)
Adding markers
The following example will display a rotated blue marker pin in Berlin/Europe.
By default, a tap on the marker centers the map over it. If an InfoWindow is defined, it will be displayed. The onTap event will only be handled if consumeTapEvents is set to true. In that case, the InfoWindow is ignored. You can also use the GoogleMapController to trigger the InfoWindow.
Adding circles
The following example will display a circle around the center of Berlin/Europe.
The radius is denoted in meters. You can adjust the style with fillColor, strokeColor, and strokeWidth and handle the onTap event if required.
Setting custom marker images
The following code sets a custom marker image by using the asset image “icon.png” in Munich/Europe.
Make sure to reference the asset image in your pubspec.yaml file.
Moving the camera
The GoogleMapController (see section “Handling events”) can be used to move the camera so that you can show a specific location to the user. It will either jump (moveCamera) or scroll (animateCamera) to the target position. An example looks like this:
// jumps to Berlin/Europe
await controller.moveCamera(
    CameraUpdate.newLatLng(LatLng(52.52309894124325, 13.413122125924026)));
// scrolls to Berlin/Europe
await controller.animateCamera(
    CameraUpdate.newLatLng(LatLng(52.52309894124325, 13.413122125924026)));
Showing the current device location
The google maps widget has the property myLocationEnabled. If set to true your current location will be marked as a blue dot on the map. To make this work, your app needs to ask for permission to use location services. If location services are enabled and permission was granted, the location will automatically be displayed. I created a separate article on that topic.
🔔 Hint
You don’t need to install the package, but you need to add the capabilities for Android and iOS. The Google Maps widget has built-in location support without any further requirements.
Source code
The source code is available on GitHub. Be aware that you need to replace the API keys inside the code with your own to make the demo code work!
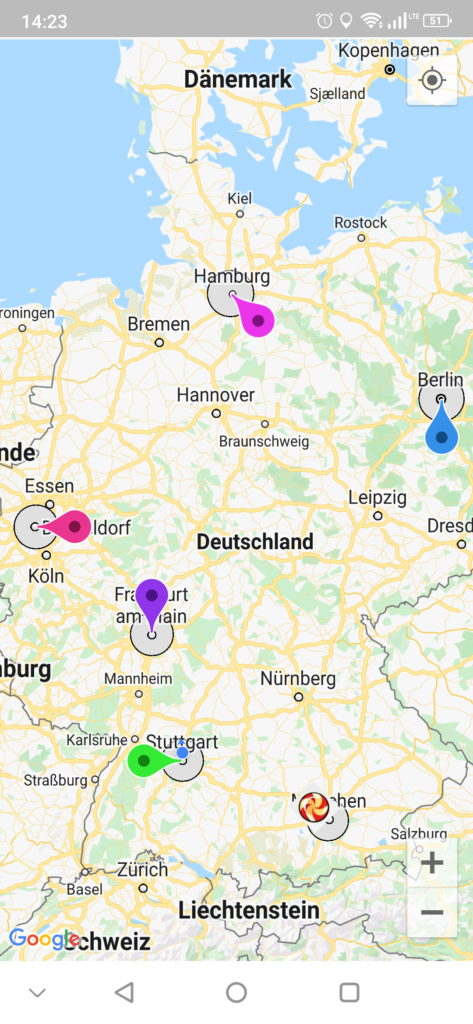
You can see a screenshot of the app below.
Conclusion
In this article, we talked about adding a map to a Flutter application. Though the setup might be a bit time-consuming, it will be worth the trouble. The Google Maps widget is quite powerful and allows you to enrich your app in a very unique way.
Related articles

